November 9th - 11th 2014
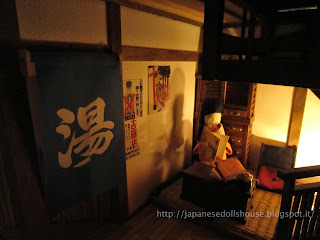
So here’s the deal. When I started the inn, I had an idea that it would be for young people, a bit bohemian. Not five star class if you get my drift. I even had an original idea to make it a Japanese bordello...course, as I got into it I could see that it really could be something nicer instead of cheap. Still, the ryokan, from the start, is a little old and not very well kept. I chose not to varnish most of the embellishments on the walls and to keep areas unfinished a bit. My choice was two fold: first I knew I was going to run into problems in the construction (both for my inexpertise and the fact that many of the pieces were badly warped to start with) so I knew the rooms and whole house would have gaps or fit together imprecisely and second, it was my first dollhouse. There was no way I was going to do justice to a beautiful five star ryokan. So, my inn is for everyone. The young the old the hippie....all are welcome! Which brings me to the back of the house.
The kit never was really set up to actually show the back of the house but I didn’t like that idea. I wanted to do something there too. Like a behind the scenes stuff going on in the alleyway kind of area. So, I purchased some stone work printed paper to use to attach or glue on the external walls around the house - exposed brick as it were. Knowing also that I had no real way to effectively hide the electrical wires, I figured I’d use this paper to create where the ryokan is pretty much falling apart - at least in the back. From the front, it looks fine. But we know that the ryokan is in dire need of repair. I used the double sided tape and attached paper over the wiring. All of this can be easily ripped out when the LEDs finally give out and need replacing (of which I have NO idea how I may mange that!) and I also cut some of the wooden beam decorations to show they had also split and fallen away. I will add broken bits of beam all along the bottom of the back sidewalk. Like they are holding them till they get a chance to renovate the exterior.
 |
| Preprinted stone wall paper. |
 |
| Cutting to size to hide the wiring. |
 |
| Cutting more pieces to size. |
Once I cut to size and shape, the back walls of the house were done. I added the last two mini awnings that went over the second and first floor center windows. And I added a few more random exposed bricks on the back. Fun.
 |
| Finished back with broken beams and exposed brick. |
I also added a few more posters and welcome signs to the inn. One that’s most important was the “no tattoo’s allowed” sign outside the onsen spa. I guess in Japan tattoos are frowned upon (due to them often being a mark of mafia affiliation) so I added that - plus a how to behave in the onsen sign on the inside wall of the changing room. Now we all know how to behave!!!
 |
| No tattoos allowed!! |
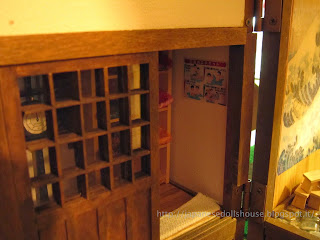 |
| Changing room now carries the "how to's" of the onsen. |
 |
| Outside welcome (blessing) sign. |
Next was making the garbage receptacle to hide the batteries. I had seen a really nice version in one of the pages that came with the kit (same place I got the inspiration for the rackets and the umbrella stand and even the kimono stand!) and I just liked the overall look of it. So again I used scraps to construct it.
 |
| Inspiration for the trash bin and place to hide the batteries. |
The outside of the scale one is made of some kind of concrete. So, I cut some wood to size and glued it together. I then added a few decorative pieces to the sides and front to simulate a heavier concrete container. Next up was covering it in a simulated concrete surface. I watered down some glue, spread it lightly over the surfaces I wanted and then sprinkled some very fine sand onto it. That made the surface rough. I know that they actually sell paints which have sand particles premixed but right now I really can’t afford to be spending money on stuff I’m only going to use this once now. Then I had to let it dry before applying the grey paint. I mixed up some dark grey and white and painted the sandy surface with some of it. I must say, it does simulate concrete fairly well. I then painted the top and the embellishment pieces a terra cotta brown (I used some leftover shingle sheets from the kit to construct the top and the front) and the trash bin was done!
 |
| The design and cut scrap pieces |
 |
| Testing the fit. |
 |
| Batteries fit in fine. |
 |
| Adding some light decorative pieces. |
 |
| Painting the concrete. |
 |
| Finished dust bin. |
I added some grass the the edges where the wires run while I was waiting for paint to dry so that it looked acceptable in the back. Eventually I will add some rubbish bags around the trash bin.
And as a final touch, Bansksy struck!! While I was waiting for paint to dry overnight, the next morning I awoke to find that Bansky had visited behind the ryokan leaving his mark in the homicidal panda. Little bastard! Now someone will want to cut away a piece of the back wall and sell it at Sotheby’s!
Anyway... wiring and back of the house - DONE! Back to tiling!


No comments:
Post a Comment